As an Amazon Associate, we earn from qualifying purchases. Some links on this site are affiliate links at no extra cost to you. Our recommendations are based on thorough research and editorial judgment.

The Design Challenges of Threshold Heights and Transition Strips in [year
Threshold heights and conversion strips require precise measurement because floor gaps of 0-12mm demand different solutions, and subfloor variations under 3mm can compromise effectiveness. You’ll need to match material pairings—T-molding for same heights, reducers for slopes—while adhering to ADA’s 1:12 maximum slope ratio for safety. Proper installation with base tracks prevents warranty voidance, buckling, and liability issues. Using digital levels and contour gauges guarantees accurate fitting. Understanding these specifications prevents costly callbacks and protects your investment long-term.
Key Takeaways
- Accurate floor height measurements using digital levels prevent tripping hazards and installation failures in doorways.
- Material pairing selection—T-molding, reducers, or thresholds—must match surface heights to avoid gaps and uneven edges.
- ADA compliance requires maximum 1:12 slope ratios with base track installation for secure, accessible transitions.
- Expansion gaps and proper alignment prevent buckling and warranty voidance from material movement.
- Contour gauges and digital leveling tools detect subfloor variations down to 2mm for precise custom fitting.
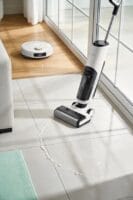
Measure Floor Heights Before Selecting Transition Strips
Measure Floor Heights Before Selecting Transition Strips
Ever installed transition strips only to find they don’t sit flush? That’s usually because someone—maybe you—skipped the measurement step. Floor height differences matter way more than most people think, and gaps ranging from 0 mm to 12 mm need totally different solutions.
You may be interested


Grab a digital level or straightedge and actually check your doorways and room boundaries. You’re looking for exact millimeter variations between surfaces. This isn’t optional—it’s the foundation of everything that comes next.
Why does this matter? Because if your subfloor heights are off, even slightly, your transition strip becomes a tripping hazard instead of a clean seam. A T-molding works for some gaps, but a reducer works for others. Pick the wrong one, and you’re ripping it out and starting over.
I’ve seen too many tile-to-LVP installations fail because someone ignored the underlayment heights. The result? Jagged seams, rework costs, and a frustrated homeowner. Here’s the trick: measure *everything* before you buy your strips.
When you’re dealing with large elevation changes—say, porcelain tile over hardwood—you might need custom profiling to keep edges safe and compliant. Honestly, this is where a lot of people get stuck, but it’s worth the extra effort.
The best part is that taking time upfront saves headaches later. Proper measurements mean safe transitions that pass inspections and keep you from getting called back to fix uneven seams.
What’s the one area in your project where floor heights feel most unpredictable?
Match Your Material Pairing to the Right Transition Type

You’re picking a laminate-to-wood connector and then grabbing the same strip for tile-to-vinyl? That’s where most DIYers—and even some installers—go wrong. Not every transition works for every pairing, and cutting corners here leads to gaps, wobbly edges, and floors that just don’t look finished.
Know Your Transition Types****
T-molding is your go-to when both surfaces sit at the same height. It works great for hard surfaces that won’t move much. If one surface is higher than the other—say, hardwood next to tile—reducers do the heavy lifting, sloping smoothly from the taller material down to the lower one. Thresholds handle doorways between any combo of materials you throw at them, while baby thresholds are specifically made for carpet transitions or sliding glass doors.
Material Matters More Than You’d Think
Here’s the thing: what material your connector is made from can make or break your installation. Wood strips swell up in damp areas—that’s just physics—so they’re a poor choice near bathrooms or kitchens. Aluminum and PVC don’t expand the same way, which means they stay put. In high-traffic hallways and entryways, go aluminum or heavy-duty PVC. Wood and MDF will dent and wear faster than you’d expect.
The Look Counts, Too
So, why does a mismatched profile bother you? Because it creates visible gaps and uneven edges that catch your eye every time you walk by. The profile—that’s the shape of the strip—needs to match the height and style of your materials.
Take time measuring and picking the right type. It prevents stubbed toes, failed inspections, and that amateur look. What matters most to you in your space—durability, appearance, or both?
Account for Subfloor Variations That Hide Beneath Seams

Account for Subfloor Variations That Hide Beneath Seams
Ever installed transition strips only to find they rock back and forth under foot traffic? That’s usually a subfloor problem hiding right under your nose.
Here’s what happens: subfloors aren’t actually flat. Even tiny dips and rises—we’re talking 3mm or less—can wreck your whole transition strip installation. When those variations stretch beyond 3mm across a 10-foot span, you’re looking at seams that won’t integrate properly and safety issues that’ll come back to haunt you.
Think about this scenario. Your hardwood substrate has a 5mm wave, and your vinyl flooring sits 2mm lower in one spot. Your reducer won’t sit flush. Instead, it rocks, sticks up, or creates a gap. Homeowners stub their toes. You get a callback. You redo the work. Nobody’s happy.
The fix starts with measurement—before you pick your strips. Honestly, this step saves so much grief:
- Use a digital level to check elevation changes at doorways and room entries
- Measure along seams where materials meet
- Map out the data so you know exactly what you’re working with
- Pay extra attention to high-traffic areas where uneven substrates cause the biggest problems
Why does this matter? Because gaps between materials turn an otherwise decent reducer into a tripping hazard. Low spots create voids; high spots create protrusions. Both spell liability.
So here’s the takeaway: assess your substrate elevation before you ever think about which transition strip to buy. You’ll avoid callbacks, keep your installations safe, and actually feel confident about the work you’ve done.
Are you measuring your substrates before selection, or discovering the problems mid-installation?
Install Transitions to Meet ADA Slope Requirements

Install Transitions to Meet ADA Slope Requirements
Got a commercial space with a height difference between two flooring surfaces? That connection strip you install isn’t just about looks—it’s about keeping people safe and staying on the right side of the law. The Americans with Disabilities Act has specific rules about how steep those transitions can be, and honestly, you don’t want to mess this up.
The magic number is 1:12. That means one inch of vertical rise for every twelve inches of horizontal run. So if you’ve got a quarter-inch step, you need three inches of horizontal space to make it work. Why does this matter? Because wheelchair users, people with walkers, and anyone with mobility issues depend on gradual slopes. A steep transition isn’t just uncomfortable—it can be dangerous.
Here’s the trick: measure your exact height difference before you order anything. Seriously, measure twice. The last thing you want is to get reducers that don’t fit your space. Once you know the number, you’ve got options. Aluminum and PVC profiles both work well and hold up over time without sacrificing that compliant slope.
Try this approach for installation:
- Use base tracks—never rely on adhesive alone
- Secure everything permanently so it won’t shift
- This ensures you’ll pass inspection and the transition lasts
The best part is that gradual reducers actually look cleaner than abrupt ones. You’re not compromising function for appearance; they go hand in hand. Your commercial space stays compliant, accessible, and professional-looking all at once.
At the end of the day, getting this right protects your business from liability and shows your customers you care about accessibility. Have you checked your current transitions lately?
Installation Mistakes That Create Accidents and Void Warranties

Installation Mistakes That Create Accidents and Void Warranties
You picked the right materials and nailed your measurements. So why does your installation still look like a disaster and void your warranty? The truth is, even perfect planning falls apart without proper installation technique.
The Expansion Gap Problem
Ignore expansion gaps and you’re basically asking for trouble. Buckling, cracking, and automatic warranty voidance follow pretty quickly. Materials expand and contract with temperature changes—that’s just physics. Skip those gaps, and you’re betting against a losing hand.
Alignment and Leveling Matter More Than You Think
Here’s what most DIYers don’t realize: poor alignment creates visible gaps that exceed safety standards. Inspection teams won’t pass it. You’ll get callbacks, failed inspections, and frustrated customers.
Failing to mark and double-check levels produces sloppy fits that inspectors reject immediately. It’s not worth cutting corners on this step.
The Adhesive Trap
Using adhesive instead of base tracks sounds easier, but it’s a shortcut that costs you later. The material shifts over time, creating trip hazards in high-traffic zones. You’ve essentially built a liability into your floor.
Custom Cuts and Contour Gauges
Not using contour gauges for irregular profiles? That leads to rushed custom cuts and protrusions that violate ADA-compliant slope limits. So, why does this matter? Because accessibility isn’t optional—it’s the law.
What’s Really at Stake
These installation errors shift liability straight to you, the installer. Manufacturers walk away clean. You’re stuck with documented safety violations, costly remediation, and potential legal exposure for property owners.
Getting installation right the first time isn’t fancy—it’s just smart business. What’s one installation step you want to double-check on your next project?
Choose Materials for Heavy Traffic and Wet Environments
Your shift strip’s material choice directly determines whether it’ll survive six months or six years in demanding spaces. So, why does this matter? Because picking the wrong material means replacing your trim every couple years, which gets expensive fast.
Heavy duty materials like aluminum and steel withstand cart traffic, foot wear, and rolling loads without deformation. You’re looking at 10+ years in commercial environments when you go this route. These materials don’t bend or buckle under pressure, which is exactly what you need in a busy space.
Moisture resistant options—PVC, vinyl, and coated aluminum—prevent swelling, warping, and corrosion in wet entryways, kitchens, and bathrooms. Frankly, wood fails within 2-3 years in these environments. It just can’t handle the humidity fluctuations. Waterproof vinyl connections resist moisture better than MDF or uncoated wood, period.
Here’s the trick: match your profiles to your flooring’s durability class and load ratings per manufacturer specs. Don’t just guess. High-impact PVC handles stair nosing demands where impact stress occurs, so if you’ve got stairs in your project, that’s your answer.
Wear layer thickness matters too. Thicker layers handle heavy traffic without weak joints or warranty violations. Match the thickness to how many people walk through the space daily—it’s that straightforward.
Truth is, proper material specification alignment prevents costly mistakes down the road. Before you order, are you confident your choice matches both your traffic level and moisture exposure?
Flush Commercial Fits: Eliminating Protruding Edges
Material selection protects your investment, but here’s the real issue: what happens when those materials actually meet your floor? In busy commercial spaces, that transition point becomes a safety problem fast.
Flush thresholds eliminate those annoying lip edges that catch people’s feet and create liability headaches for retail shops, hotels, and offices. The goal is getting profiles that sit perfectly level with both sides of the flooring—no gaps, no bumps. This takes careful measurement and custom fitting, but it’s worth it.
Why does this matter? Because uneven thresholds don’t just look sloppy. They’re also a compliance nightmare and increase accident risks significantly.
Here’s where reinforcement comes in. In doorways and hallways where foot traffic hits 500+ people daily, you need aluminum or steel backing. Loose or uneven strips fail ADA inspections and make accidents more likely. Try this: skip adhesive-only installations. Use base tracks instead. They keep thresholds stable through heavy daily use.
The trickiest part? Dealing with irregular subfloor profiles. That’s where contour gauges become your best friend—they help you map out exactly what you’re working with before you commit to the installation.
Get this right, and your commercial space stays code-compliant and accident-free for years. Get it wrong, and you’re dealing with repeat problems and safety complaints. What does your current doorway transition look like—is it creating issues you’ve been ignoring?
Expansion Gaps in Transitions: Why Buckling Happens
Expansion Gaps in Transitions: Why Buckling Happens
That gap between your new flooring and the T-molding? It’s not a mistake—it’s actually the most important thing you can get right. Skip it, and you’ll be dealing with lifted edges and tripping hazards within a year.
Wood flooring moves. A lot. We’re talking up to 2% expansion and contraction depending on the season, humidity, and temperature swings your home experiences. When you install T-molding tight against the flooring without any wiggle room, you’re basically trapping that natural movement. The wood pushes outward, the molding can’t budge, and something’s gotta give—usually the edges of that strip, which curl up and become a safety problem.
So, why does this gap matter so much? Because moisture and temperature changes happen constantly, not just in summer or winter. Your flooring is always adjusting slightly to its environment. If you don’t account for that, you’re pressurizing the entire transition.
Here’s what you actually need to do: Leave a ¼-inch clearance on each side between the flooring and the molding. That space is your safety valve. It lets the wood move naturally without fighting against a rigid barrier.
Try this approach when choosing materials. Aluminum and PVC thresholds handle expansion way better than wood alternatives. They’re more forgiving and won’t add extra pressure to the flooring the way solid wood can.
The tricky part isn’t understanding the concept—it’s remembering to do it right from the start. Frankly, it’s easier to get spacing correct during installation than to rip everything up later and fix it.
Get the spacing right, and your flooring stays flat, your molding stays down, and you avoid creating a tripping hazard. What’s holding you back from double-checking your own installations?
Custom Profiles for Irregular Floors: Tools That Get It Right
Perfect spacing won’t fix a floor that’s wavy, sloped, or uneven underneath. If your subfloor’s irregular, you’re going to run into misaligned adjustments and real safety problems. This is where customization comes in.
So, why does this matter? Because you can’t just eyeball it and hope for the best. Contour gauges are the tool that actually works here—they capture exactly how your floor varies across 12-inch sections. Instead of guessing and ending up with visible gaps or tripping hazards, you get accurate templates. Place the gauge perpendicular to your adjustment line and transfer those measurements straight to your profile material.
Digital leveling tools are another essential. They measure elevation changes down to 2 millimeters, so you catch the high and low spots before you start installing anything. That data becomes your guide for making custom cuts that fit your specific floor shape.
Here’s the thing about complex irregularities: DIY solutions often fall short. Professional-grade profiling ensures a flush fit without edges sticking up—and frankly, that’s the difference between a job that lasts and one that creates rework and liability headaches. You also stay code-compliant no matter what materials you’re combining.
The bottom line? Take the time to profile your floor correctly. It prevents problems down the road and keeps your installation solid.
Verify Your Transition Matches Flooring Warranty Specs
Your flooring warranty‘s fine print—that’s what actually protects your investment when transitions fail. And honestly, most people skip right over it.
Matching your junction strip to what the manufacturer says you need is non-negotiable. You’ve got to confirm that the material, dimensions, and load rating line up exactly with what’s in your flooring documentation. So, why does this matter? Because installing the wrong transition can void your entire warranty, even if the flooring itself is perfect.
Let’s say you’re looking at aluminum reducers. You need to verify they meet the wear layer thickness and durability class your hardwood or laminate requires. It’s not just about picking something that looks right—it’s about coverage eligibility.
Your warranty paperwork will spell out the acceptable junction types, installation methods, and environmental conditions you’re working with. Read it carefully. Here’s the thing: a wood threshold might look beautiful in an entryway, but if that space gets moisture, you’re not covered. Aluminum or PVC alternatives will keep your warranty intact, even if they’re not your first aesthetic choice.
Commercial spaces with heavy foot traffic? Different story entirely. You’ll need high-impact profiles rated to handle carts, chair wheels, and constant abuse. Frankly, skipping this step in a busy area is asking for edge failures down the road.
The best part is this doesn’t take long: document your junction choice against your warranty requirements before you install anything. Just snap a photo of the spec sheet and your selected product side by side. This one small step prevents claim denials when problems show up later.
Frequently Asked Questions
How Do I Visually Identify Which Transition Type I Need Without Professional Measurement Tools?
I’d picture yourself kneeling between two floors—imagine the height gap. If they’re nearly level, you’ll need a T-molding; slight drops call for reducers; doorways demand thresholds. I’ll watch how light falls across seams—shadows reveal what changeover type you’re really needing.
What Warranty Coverage Applies if a Transition Strip Fails After Installation?
I’d check your product’s warranty exclusions first—most change guarantees cover manufacturer defects, not installation errors or improper material selection. You’ll likely need proof of correct installation and compatible flooring for coverage eligibility.
Can Existing Transitions Be Replaced Without Removing Surrounding Flooring Materials?
I can replace your existing connections without removing surrounding flooring by using specialized installation techniques. Modern transition materials often feature modular designs that slip beneath flooring edges, allowing me to extract the old strip and insert a new one seamlessly.
How Long Do Different Transition Materials Typically Last in Residential Versus Commercial Settings?
I’d say wood changes last 5-10 years residentially but fail faster commercially due to heavy traffic and moisture. Aluminum and PVC offer superior change durability, lasting 15-25 years in residential settings and 10-20 years under commercial wear, depending on maintenance.
What’s the Cost Difference Between DIY Installation Versus Hiring Professional Threshold Installers?
You’ll save on labor expenses doing it yourself, but you’ll risk costly mistakes. I’d say DIY runs $50–200 in installation costs, while professionals charge $300–800. The difference? Their expertise prevents rework that’d drain your wallet faster.


